Saturday, May 9, 2015

Service Manager - Employee Management, Part 3

3:51 PM Posted by A 4 comments

NOTE: Times have changed and so have my opinions. Please read this first - http://scsmmercenary.blogspot.com/2016/02/in-defense-of-class-extension-vs.html


I've been working on this post for awhile, because the first two posts are relatively straight forward in comparison (here's Part 1 and Part 2). In addition, there are a few posts out there that while walking you through this (new) employee scenario don't answer some fundamental issues such as...
  • Dynamically placing a user in an Organizational Unit within Active Directory
  • Dynamically creating a username based on username availability
  • Add the new user to multiple groups
To be fair I don't think the points are addressed for two reasons...
  1. The post would be crazily lengthy (like this one is about to be) because it can't possibly cover all the variables you'd want to take advantage of in your respective organization
  2. With point one made, for the sake of brevity the posts are addressing the core question of - How do you create a user through Service Manager and Orchestrator?
So, no one's fault really. Makes sense to me. But you will undoubtedly ask the same questions once some kind of unique scenario comes along and you're forced to re-think it all through. I'll try to get through as many as I can so hopefully what I'm about to get into will save you those future headaches, give you some new ideas, and possibly ways to alter other requests you already have.

Let's Go Get that Service Request in Orchestrator
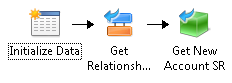
First thing's first. We need to start building the runbook that is going to parse our custom Service Request class we've been building so as to create an employee within Active Directory. To do this we'll start with three core activities.
  1. Initialize Data (runbook control activity)
  2. Get Relationship (service manager activity)
  3. Get Object (service manager activity
Again, you're free to call these whatever you'd like. But I'm going to rename those activities in my runbook too...
  1. Initialize Data
  2. Get Relationship (Runbook to Service Request)
  3. Get New Hire Account SR
Wire them up and then let's get started.


Here's how we'll configure each of the activities:

Initialize Data
Change Parameter 1 to "ActivityGUID"


Get Relationship (Runbook to Service Request)
 
  1.  Change your Connection to your Service Manager system. This is defined through Orchestrator -> Options -> SC 2012 Service Manager. Mine is just called Service Manager, if you manage multiple environment you have/want multiple connectors like "Production" and/or "Development"
  2. The Object Class will be set to Runbook Automation Activity
  3. The Object GUID is published data from the previous step. Right click in this text area, select Published Data and pick ActivityGUID from the previous step
  4. Related Class is the class we've been creating. I called mine "Service Request, Human Resources". Now you may see why! Because I know in the possibly giant list of class to pick from exactly where to find the class I made. It's a normal Service Request + my HR customizations. Just easy for alphabetical sorting is all.

When it comes to Service Manager and Orchestrator (if you've never done this before), is we keep bouncing back n forth between one object in the system to another. This is commonly expressed through the use of the "Get Relationship" activity which we'll be using quite a bit. Another way to think about this is an Incident. An incident has a title, but it has relationships to Active Directory users. Like Created By, Affected User, Assigned To, Related Configuration Items, etc. The use of the "Get Relationship" activity will become increasingly clearer as we move through this and other requests.

Alright so we have the basis for this thing setup. When the runbook executes from within Service Manager, it will call Orchestrator and figure out the relationship between itself and it's parent Service Request. So right now we're just querying data. That's all it will do!


 Let's Go Get an Available Username
 Next, we'll need to build a username for our new user. But I want to get a little creative and scour Active Directory first for availability before continuing on in my runbook and possibly shooting myself in the foot downstream. To do so, we're going to turn to our trusty friend PowerShell so head over to System Activites and grab a "Run .NET Script"


 Once you open it up, change the Type to PowerShell. Then use the following code (forgive the formatting, blame Google):
$session = New-PSSession -ComputerName YOURORCHESTRATORSERVERHERE  
$result = Invoke-Command -session $session -ScriptBlock {
$firstName = "Published Data - NewHire First Name"
$firstName = (get-culture).TextInfo.ToTitleCase($firstName.ToLower())
$lastName = "Published Data - NewHire Last Name"
$lastName = (get-culture).TextInfo.ToTitleCase($lastName.ToLower())
$fnLength = $firstName.Length

if (($lastName.IndexOf("'") -ne -1)
{
  $lastName = $lastName.Replace("'", "")
 
}
elseif (($lastName.IndexOf("-") -ne -1))
{
  $lastName = $lastName.Replace("-", "")
 
}
elseif (($lastName.IndexOf(".") -ne -1))
{
  $lastName = $lastName.Replace(".", "")
}
else
{
  $lastName = $lastName
}
$x = 1
while (($x -le $fnLength))
{
  $username = $lastName + $firstName.Substring(0,$x)
try
{
  # A user was found. Lame.
$U = Get-ADUser $username -ErrorAction Stop
}
   
catch [Microsoft.ActiveDirectory.Management.ADIdentityNotFoundException]
{
  # The user was not found! We're using this one!
break
}
  $x++
}
  new-object pscustomobject –property @{
username = $username
}
 
}
 $availableUsername = $result.username


If you're new to using PowerShell within Orchestrator - there are a few issues you'll bump into that are not worth flipping tables over. Especially in the getting started phase! So let's clear something up first.

PowerShell through the eyes of Orchestrator is a 32bit process running PowerShell version 2 

That means things you probably take for granted like "Get-ADUser" and other necessary commands aren't available. BUT! There is a way around it and it's featured above. Since PowerShell v2, 32bit isn't capable of the above I just wrapped the entire script inside of another script. A script that runs on the local Orchestrator server running Server 2012r2 with 64 bit, PowerShell 4. Woot! Hence the funky bit on the end of the script where we take the available username we found, publish it from Orchestrator's Server, back onto the 32 bit Orchestrator databus, and thus in turn a variable we can make use of downstream in our runbook. Yes. It's annoying. That's all there is to say about that. Back to the script!


You'll have to change three variables in the above script. First, you'll have to change it to the name of your Orchestrator server. Next, you'll have select Published Data from your Get New Account SR for your first and last name. I also from the start of the script take into account possible grammar mistakes for someone typing the new hire's name in. So someone can't type ADAM DZAK and that's how the account get's created. It all gets formatted to lowercase, then uppercase the first letter in each word. In the lines following I account for the potential ridiculousness of naming consistency in an Active Directory environment by removing apostrophes, extra periods, hyphens, etc. Obviously you don't have to use these, but when it comes to usernames I wouldn't mind some consistency. Secondly, the username is getting formatted like Last Name + First Letter of First name. So if I ran this script against myself I'd get dzaka. On the next pass I'd get dzakad. Etc. Etc. As you can see it doesn't take much to rework this part to your needs.

Finally I make sure this Run .NET Script Publishes data to consume in the "Create User" activity for Active Directory:

Update our Service Request
I end up doing this a lot in my SR, but now that we have the username we can update the "Employee Username" property. It's really simple. Just use a "Update Object" activity. Select the Class as "Service Request, Human Resources" (or whatever you called your class) and grab the "Employee Username" property and update it with Published Data from "Get Available Username"


This may open up a few more ideas like changing the Title of the Service Request from your templates stock "New Hire" to "New Hire - Adam Dzak". We'll get to that step later (post Active Directory creation). But just a heads up this a great way to keep customizing your environment and improving user experience for not just your business but your IT department as well.

Let's Get the Manager
I know we haven't built the Request Offering yet, but here's how we'll configure our Runbook to get the manager from the Service Request. We'll use two activities to do this, Get Relationship and Get Object.


To configure these activities, let's start with Get Relationship (SR to AD Manager). Use your Service Manager Connection you used originally, define the Source Class as "Service Request, Human Resources", the Object GUID is the SC Object GUID of Get New Account SR. The Related Class is Active Directory User.
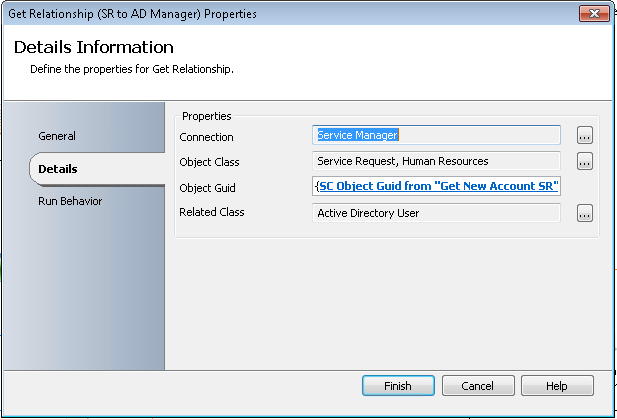


Next, the link between both will get the following exclude treatment. Just double click the arrow between both to bring up this menu.
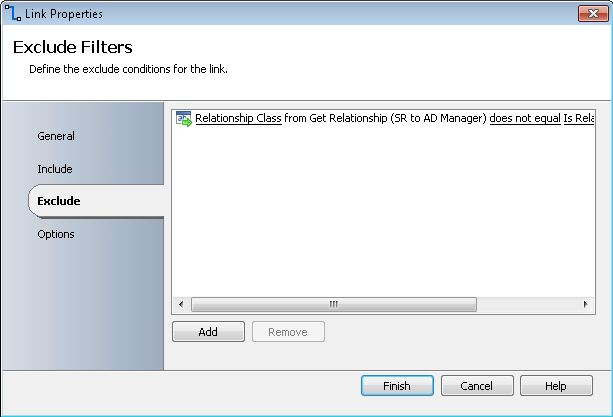

In the Link properties, head to the "Exclude" menu and change it to contain the above. Relationship Class from Get Relationship (SR to AD Manager) does not equal Is Related to Configuration Item. What we've done here is say "Get me all Active Directory users that are related to the Service Request, but only get me the ones that are 'Is Related to Configuration Item'"

Let's dissect this a bit. A Service Request will have a few users associated to it upon submission. Created By and Affected User. When we build our Request Offering to allow the selection of a manager, we'll store that selection in the "Related Configuration Items" tab of the Service Request. Bringing the total Active Directory users related to the SR to 3. This above link lets us uniquely identify this Relationship and pass the singular object (user) into the next activity of Get Object. So instead of 3 users, we only get 1.

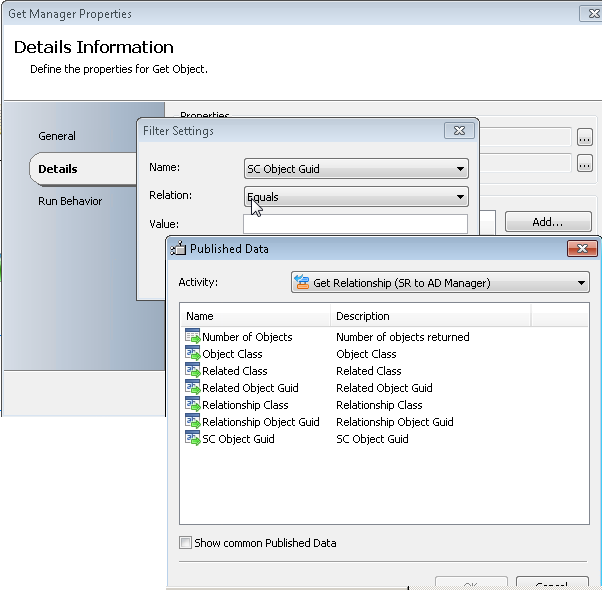
Finally, let's grab the Manager object. We do this simply using "Add" selecting "SC Object Guid" and using the published data of our previous "Get Relationship" step. We do this by selecting the "Related Object Guid"


I want to repeat that because it bears repeating. "Related Object Guid" not to be confused with the other ones.


If you've made it this far, here's what the runbook should look like by now.


When you think about it, we have pretty much everything we need to build our employee. We have the all the employee properties stored in the Get New Account SR, we have the username from our Get Available Username PowerShell script, and we have the manager stored away in the Get Manager object.

Neat. What about the OU?

I have one guess as to why the OU topic isn't tackled elsewhere, because it requires more PowerShell. Well I could be wrong. But it's the way that makes the most sense to me.

You'll need to create a custom PowerShell script that takes the selected "Department" value and translates that somehow into an OU match.

This is where you need to have some Active Directory planning in mind plus an idea of how you are going to add items to your Department's List in SCSM that you created in Part 1 of this blog series. Let's say you have a Department List in Service Manager that looks something like...

  • Administration
  • Accounting
  • Information Technology
    • Developers
  • Human Resources

Here's what I'm getting at. You'll need a PowerShell script that essentially does the following. So grab a .NET Script, wire it up after your Get Manager activity, and rename it to something descriptive. Such as Get OU to Place, then via its Published Data, you publish out the variable myOUPath. This variable is then ultimately used in the "Create User" Active Directory activity. Since we are just playing with strings in the script, we don't need to use 64bit PowerShell on our Orchestrator server.

$department = "Published Data - NewHire Department"
if ($department -eq "Accounting")
{
$myOUPath = "OU=Accounting,DC=domain,DC=com"
}
elseif ($department -eq "Developers")
{
$myOUPath = "OU=Developers,OU=Information Technology,DC=domain,DC=com"
}
However with the above said, this means all the departments in your Departments List must be uniquely named for the purposes of this Get OU to Place script. Personally I don't see the drawback to this because I can't envision where a company would have two departments with the same name. BUT! Even if they did, all you'd have to do is rename the department in the list to have a bit more clarity and then problem solved. For example, if you had two departments called "Developers" you just change the name in the list to "Developers for IT" and "Developers for Accounting" as child items underneath each. Whichever he case, I'm open to suggestion here. However it's how I'm going to continue along in this runbook building my employee for dynamic OU placement.

What about their password?

A few ways to accomplish this, but it has nothing to do with custom PowerShell code!
  1. Statically define it in the Create User activity.
    • Your security folks probably won't like this
    • If you need to change it, you need to check out the runbook. Not ideal either
  2. Statically define it in the Create User activity and add some dynamic value
  3. Dynamically define the whole thing
Options 2 or 3 are the most favorable. Plus it's really easy to do using the Generate Random Text activity from the Utilities area of Orchestrator.


When it comes to the Create User activity, we just use this activities Published Data to set the password. Now how you choose to share the password is up to you and all sorts of interpretation. Here's a really quick, no real extra work in Orchestrator thing you can do...
  • Use a "Send Email" activity to email the manager (which you have by now) the new user's password
  • Write it out to a file somewhere that only certain people have access to on your network
The point is - lot of options herethat you can/should tailor to your environment's needs and standards.

Finally, the moment you've been waiting for
Let's drop the Create User activity into our runbook. Wire it up and start pulling out the following properties:
  • Common Name
  • Department
  • First Name
  • Last Name
  • Manager
  • Container Distinguished Name
  • Password
  • Title
  • User Principal Name
  • Change Password at Next Logon
Values you set are probably obvious at this point - a whole lot of Published Data!
  • Common Name - CN={EmployeeFirstName from Get New Account SR EmployeeLastName from Get New Account SR}
  • Department - EmployeeDepartment  from Get New Account SR
  • First Name - EmployeeFirstName from Get New Account SR
  • Last Name - EmployeeLastName from Get New Account SR
  • Manager - Distinguished Name from Get Manager
  • Container Distinguished Name - myOUPath from Get OU to Place
  • Password - Published Data from Generate Random Text
  • Title - EmployeeTitle from Get New Account SR
  • Sam Account Name - availableUserName from Get Available UserName
  • Change Password at Next Logon - true
I want to note something here. I used FirstName space LastName as the Common Name. Maybe you want to use the AvailableUsername property here? Same thing goes for the UserPrincipalName - maybe I want to use the same? Maybe I to do FirstName.LastName - the point is you can get creative here and mix statically defined values plus Published Data. So no reason you couldn't just type a password and add the Published Data from the Generate Random Text value. This all depends on your environment! If you want to make sure you are adding spaces and other characters, right click in the area to input values and hit "Expand". This will give you a resizable window to drop values into. Purely a view thing worth bringing up.

The last step is to grab Enable User from the Active Directory activities and feed it the Distinguished Name published data from the Create User  activity.

BOOM! You got a user created.

Add the User to Groups...with an s
I know there is a "Add to Group" activity within the Active Directory activities, but it's only one group! I can only add a single group?! One group?! What good is that? What if they are in different departments? This will always be different! To PowerShell!

Much like the Find OU to Place PowerShell script, we need to do something similar with dynamically adding certain groups based on the...you guessed it... Department value as picked from the Department List.

$department = "Published Data - NewHire Department"
$samAccountName = "Publishd Data - Create User Sam Account Name"
if ($department -eq "Accounting")
{
Add-ADGroupMember -Identity "accounting group" -Members $samAccountName
Add-ADGroupMember -Identity "this other group" -Members $samAccountName
Add-ADGroupMember -Identity "some other group" -Members $samAccountName
}
elseif ($department -eq "Developers")
{
Add-ADGroupMember -Identity "accounting group" -Members $samAccountName
Add-ADGroupMember -Identity "this other group" -Members $samAccountName
Add-ADGroupMember -Identity "some other group" -Members $samAccountName
}

Now, this is messy. I'll grant you that. If you have a lot of departments, then you have a lot of PowerShell code to account for all the scenarios. It certainly gets the job done, but as you can see could become unmanageable.

BUT! I like it because it means I have a single place to edit the default groups that users get when they are created or switch departments (the Service Request, Human Resources request that we've be building here if you haven't already surmised would lend itself really well to the idea of automatically transferring departments. You could use the same lists, the same scripts, etc.) So there are a bit of two sides to this and you can probably guess where I fall.

Don't forget, if you go this route you'll have to wrap it inside a 64 bit PowerShell script. That said the above becomes the following:

$session = New-PSSession -ComputerName YOURORCHESTRATORSERVERHERE
$result = Invoke-Command -session $session -ScriptBlock {
$department = "Published Data - NewHire Department"
$samAccountName = "Publishd Data - Create User Sam Account Name"
if ($department -eq "Accounting")
{
Add-ADGroupMember -Identity "accounting group" -Members $samAccountName
Add-ADGroupMember -Identity "this other group" -Members $samAccountName
Add-ADGroupMember -Identity "some other group" -Members $samAccountName
}
elseif ($department -eq "Developers")
{
Add-ADGroupMember -Identity "accounting group" -Members $samAccountName
Add-ADGroupMember -Identity "this other group" -Members $samAccountName
Add-ADGroupMember -Identity "some other group" -Members $samAccountName
}
}

Again, replace the Orchestrator server with your Orchestrator server's name. However unlike Find OU to Place you'll notice we aren't publishing any data back onto Orchestrator's databus so that step isn't used.


Whew. Alright. That's that. Next post we'll wrap this entire thing by building the Request Offering that we'll present to end users on the Service Manager portal.

Any questions so far? Need help with something? Find me on TechNet or Twitter.

Part 4 is here

Monday, May 4, 2015

Getting Started with SQL Queries for your SCSM Data Warehouse

4:58 PM Posted by A No comments

So you deployed Service Manager. You understand XML, you can write some PowerShell scripts, but this SQL thing is just...well it's something else. You'll get around to understanding it later, right? If you are a Service Manager army of one (or perhaps just a curious IT department member), you may find yourself juggling a host of technical abilities as you design basic management packs, query for certain types of data with PowerShell, but how long can you fend off your management before you're asked to produce reports about all the data flying through SCSM? Incidents, Service Requests, Changes are things you'd want at a minimum.

Unfortunately - SQL isn't your strong suit. Sure you can do some basic queries like...

SELECT id, title, createddate
FROM IncidentDimvw
WHERE createddate > '01/02/2015'

But what about the Affected User? That isn't on the IncidentDimvw table so how do you get it?

"I've seen a few TechNet Gallery publishings do this JOIN or INNER JOIN thing. I just don't get it. It's nothing like PowerShell or other things I've used/seen."

You're right. SQL is a different beast from something like PowerShell, C#, and other programming languages. Because it isn't a programming language, it's a Query Language or to be more precise - a Structured Query Language. So let's go over some SQL basics and then use those to apply to real world, use case scenarios for Service Manager. Before you keep reading, make sure you grab a copy of the DWDataMart schema and have the Incident window selected within it as you read along. The download link is at the bottom of that post.

In the first example, I'm doing something obvious (or not so obvious depending on your SQL knowledge). I'm selecting properties I want from the incident table where the incident's createddate is greater than 01/02/2015. The question I posed shortly thereafter was "What about the Affected User?" If you consult the Incident diagram on the Visio diagram you see directly beneath IncidentDimvw there is the UserDimvw table. If you study both closely nothing really stands out as "Affected User". What gives? Go ahead and flip to the "Work Item" diagram and see if you can find it there.

Huzzah! There's the Affected User! Wait. What else am I looking at?
So you have the Affected User Table and it has arrows forming a relationship between it and the UserDimvw and WorkItemDimvw table. Look closely at the properties of UserDimvw. Looks very Active Directory-ish eh? By having a relationship between the Affected User table and the User table - we can pull the properties about that Affected User. We also have the Work Item table. I know what you're thinking.

Seems kinda limited...

But the Work Item tables has two rather necessary things on it: WorkItemDimKey and EntityDimKey. I'll pause for a moment while you flip back to the Incident diagram and look at the first few properties of the IncidentDimvw table. See where this is going now? As you may already know working within Service Manager an Incident is a type of Work Item. Having just walked through this we can see that:
  • The Incident table relates to the Work Item table
  • The Work Item table relates to the Work Item Affected User table (and assigned to, created by, etc)
  • Work Item Affected User relates to the User table
We now have the conceptual basis for building our first SQL query against the data warehouse. In this example, let's get all Incidents created after 01/02/2015 along with all of their Affected Users.

First, let's use the original query as our starting block.

SELECT id, title, createddate
FROM IncidentDimvw
WHERE createddate > '01/02/2015'

Next we need to establish what the relationship between the Incident and the Work Item is in our query

What?! It's established in the diagram! I mean the database! Why do I have to do it! Doesn't it know!?

Well - yes. Well, no. Ok sort of. I'll get to that I promise. What we need to do is add a JOIN into our query and ALIAS the incident table. Which is exactly what it sounds like, it's just an alias or our notation within our query. A JOIN is a way of doing a SELECT on second table and then joining that data together from your first table to form your result. But first, let's get the ALIAS out of the way

SELECT ir.id, ir.title, ir.createddate
FROM IncidentDimvw as ir
WHERE ir.createddate > '01/02/2015'

That wasn't so bad right? I used "ir" for Incident Request, but you could use anything you like. For example, here's the same exact query just with a different alias.

SELECT dzak.id, dzak.title, dzak.createddate
FROM IncidentDimvw as dzak
WHERE dzak.createddate > '01/02/2015'

Next, let's do our first join to establish a relationship between IncidentDimvw and WorkItemDimvw.

SELECT ir.id, ir.title, ir.createddate
FROM IncidentDimvw as ir
    INNER JOIN WorkItemDimvw on ir.EntityDimKey = WorkItemDimvw.EntityDimKey
WHERE ir.createddate > '01/02/2015'

In the above, you may have seen a pattern emerge. Join the WorkItem table on the IncidentDimvw's EntityDimKey property and say that property equals the WorkItemDimvw's EntityDimKey property. Perhaps the best way of explaining it, is showing it - INNER JOIN TableA on TableB.Property1 = TableA.Property1. Next, let's clean things up with an alias for Work Item

SELECT ir.id, ir.title, ir.createddate
FROM IncidentDimvw as ir
    INNER JOIN WorkItemDimvw as wi on ir.EntityDimKey = wi.EntityDimKey
WHERE ir.createddate > '01/02/2015'

Now let's join up the Affected User table

SELECT ir.id, ir.title, ir.createddate
FROM IncidentDimvw as ir
    INNER JOIN WorkItemDimvw as wi on ir.EntityDimKey = wi.EntityDimKey
    INNER JOIN WorkItemAffectedUserFactvw as WIAU on wi.WorkItemDimKey = wiau.WorkItemDimKey
WHERE ir.createddate > '01/02/2015'

Then we need to connect the UserDim table to the Affected User table (this will allow us to pull attributes about the user such as title, department, username, etc)

SELECT ir.id, ir.title, ir.createddate
FROM IncidentDimvw as ir
    INNER JOIN WorkItemDimvw as wi on ir.EntityDimKey = wi.EntityDimKey
    INNER JOIN WorkItemAffectedUserFactvw as WIAU on wi.WorkItemDimKey = wiau.WorkItemDimKey
    INNER JOIN UserDimvw as affectedUser on wiau.WorkItemAffectedUser_UserDimKey = affectedUser.UserDimKey
WHERE ir.createddate > '01/02/2015'

Finally, modify our original SELECT statement to pull data from all these tables we've done joins on

SELECT ir.id, ir.title, ir.createddate, affectedUser.DisplayName, affectedUser.Department
FROM IncidentDimvw as ir
    INNER JOIN WorkItemDimvw as wi on ir.EntityDimKey = wi.EntityDimKey
    INNER JOIN WorkItemAffectedUserFactvw as WIAU on wi.WorkItemDimKey = wiau.WorkItemDimKey
    INNER JOIN UserDimvw as affectedUser on wiau.WorkItemAffectedUser_UserDimKey = affectedUser.UserDimKey
WHERE ir.createddate > '01/02/2015'

And for some icing (i.e. making an SSRS report)

DECLARE @StartDate datetime
SET @StartDate = '01-02-2015'

SELECT ir.id, ir.title, ir.createddate, affectedUser.DisplayName as 'Affected User', affectedUser.Department as 'Department'
FROM IncidentDimvw as ir
    INNER JOIN WorkItemDimvw as wi on ir.EntityDimKey = wi.EntityDimKey
    INNER JOIN WorkItemAffectedUserFactvw as WIAU on wi.WorkItemDimKey = wiau.WorkItemDimKey
    INNER JOIN UserDimvw as affectedUser on wiau.WorkItemAffectedUser_UserDimKey = affectedUser.UserDimKey
WHERE ir.createddate > @StartDate

All in all, hopefully you see what we've done here. We started with an Incident and quickly began hopping around to other related tables. Once we defined how these things were related (by virtue of our INNER JOINS), we did a SELECT to pull the specific properties we wanted from each table by calling out their ALIAS.PropertyName.

It may beg the question to those getting started, just what is an inner join? Are their more types of them? Absolutely! So what are they? To that look no further than the trust W3 Schools with their explanations and trusty diagrams.

But this is just for an Incident! Think about Service Requests! Change Requests! LET'S QUERY ALL OF THE THINGS! With the above being said, if you haven't already done so, take a glance at my Affected User Incident report on TechNet where the above is done and then some. Hopefully looking at it makes even more sense given the above!

Get your download on here.

Tuesday, April 21, 2015

SQL Reporting - Affected User Report

5:15 PM Posted by A No comments


I'm just going to go ahead and say it - the reports that come out of box with Service Manager does almost nothing in the way of providing value on Day 1.

But then again, neither does complaining about it. So it wouldn't hurt to start sharing some SQL queries to get you going ASAP on your SCSM data warehouse. While their are a host of things you could report on I want to start with a few that you typically would have to do a double take on and say aloud "Wait, that isn't an out of box report?" This is probably going to be the first in a series of said reports so I'll start with something I recently answered on TechNet...

How Do I Get an Affected User Report?

There are a few ways to answer that question, so I'm going to go with the one that gets you a whole lot of data and then leave it to you to remove what you don't want via picking and choosing what's in the SELECT or WHERE statements. Specifically this query will get you the following...
  • Get me a list of all Incidents (IR34985, IR34986, etc.)
  • For each incident show me the
    • Status
    • Title
    • Resolution Description (will be null if not resolved)
    • Incident classification
    • Employee (Affected User)
    • Employee's Department
    • Hours and Minutes to resolve
I like this query because I think it's an absolutely great starting block for building other similar reports such as...
  • Show me all Incidents broken up by Department (AD User's Department attribute)
  • Show me Average Time to Resolve per Affected User
  • Show me Average Time to Resolve per Department
  • Show me Average Time to Resolve per Classification
  • etc

With that said, this is best viewed as a starting point. It will run on its own as is, but the power is going to come from your selective modifications of it. Additionally, consider this query a quick way to solve the problem. SQL joins aren't done as pleasantly as they could be (i.e. I was lazy and didn't join the Status table and instead just used substrings)

Get to downloading here on TechNet and if you'd like to see the original thread (which is almost verbatim what I typed) you can check that out here.

Update 6.29:
This report was updated on TechNet and I wrote a follow up blogpost as to the "why". You can read it here.

Wednesday, April 15, 2015

Service Manager - Employee Management, Part 2

8:30 PM Posted by A 2 comments


My personal driving incentive here is to familiarize people who have ZERO experience with Service Manager, Orchestrator, and PowerShell - a starting ground from the perspective of someone who has to develop for the entire product by themselves. Don't even get me started on the 18 blogs, 3 TechNet forums, and other places I had to compile in my head just to build a "Create a Shared Mailbox on Office 365" Service Request. Blehhh...well. Now that I think of it, that would probably make a good post. Anyway, back to customizing that EmployeeManagement management pack!

NOTE: Times have changed and so have my opinions. Please read this first - http://scsmmercenary.blogspot.com/2016/02/in-defense-of-class-extension-vs.html

With the definitions of our management pack...uhh....defined. Next we want to customize the Service Request form so that we can interact with these properties from the Service Manager console.


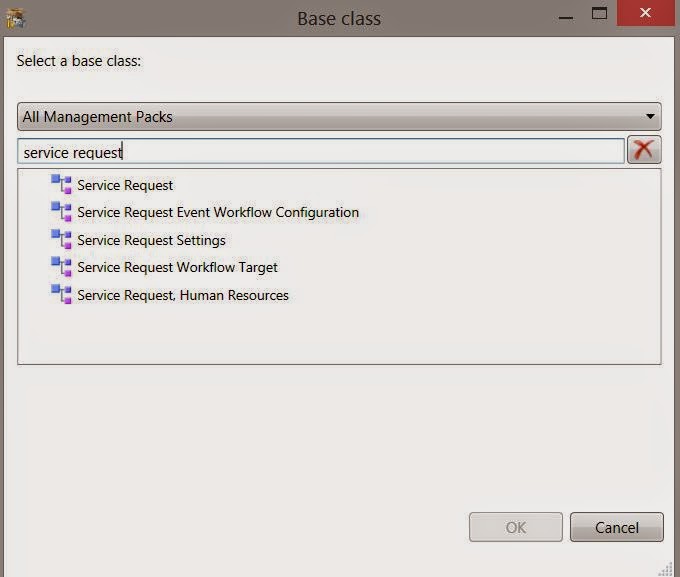
To start, just right click on "Forms" within the custom management we've been building (in this case Forms underneath our EmployeeManagement management pack) and click Add Custom. In the next window that opens, search for "Service Request"


One of those options look familiar? :)
Select "Service Request, Human Resources" and hit OK. If you called your class something else then pick that. What we are doing in this step is defining what the GUI form we see in SCSM is based off of. In picking our custom class, we are building a wholly unique Form with our custom backend properties. This is important as in doing so we'll have a truly custom management pack that can be imported/deleted from SCSM environments. So if you have a dev environment, if you are building management packs for other people, this is how we truly isolate the management pack and its respective customizations. When this post wraps, we'll have a SINGLE file that contains the alterations to the Service Request class (EmployeeFirstName, etc) and a custom Service Request form that displays our new values.

Now before you can fill out the next window that pops up, there is some file management we need to take care of before moving on. Open up File Explorer and navigate to the Authoring Tool installation directory. It should be this...

C:\Program Files (x86)\Microsoft System Center 2012\Service Manager Authoring\Library\ServiceRequest

And then copy this file to the directory where you are currently saving your EmployeeManagement management pack too.

Microsoft.EnterpriseManagement.ServiceManager.Applications.ServiceRequest.Forms.dll


Wait a second, how did you know how to do that. There is no way I would have known to find this file, in this folder...

This is one of my larger criticisms on the Service Manager development front, because it's this kind of stuff that makes SCSM not only look intimidating to outsiders, but it makes less approachable when the only documentation that can only be assumed to exist is TechNet. Even still, this in its own right requires one to invest a fair amount of time (no less if you've never done this before)! This also to be fair is the kind of thing that is part of the "hidden costs" of Service Manager and that hidden cost is development time.

Regardless, now you know this is here! But more importantly you can go up a level and find other familiar classes (like Incident, Change Request, etc) and take what you learn here to apply to those forms as well.

C:\Program Files (x86)\Microsoft System Center 2012\Service Manager Authoring\Library

Let's Build a Form!
Now on that new Window that opened up after you hit "Add Custom" we need to define a few things.


The first thing I've done is given a name to my form, in this case I went with "EmployeeInformationForm". Next, I browsed to where my custom management pack is currently stored (and where I copied that dll too) and select that dll. If you read the file name it's may be rather obvious what we are doing here - taking the original Service Request form (as defined by Microsoft), and making our own derivation of it. Finally in Type we select "ServiceRequestForm" since that dll contains a few different definitions. Then hit Create.

Woot!
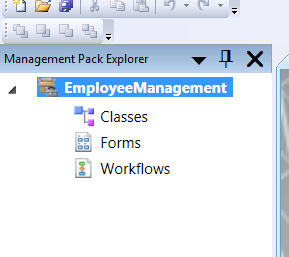
Hopefully this is becoming increasingly clearer to you what we're doing. I've expanded my choices within the custom EmployeeManagement management pack and you can see we have our custom properties (defined via Classes) and our soon to be custom form (defined via Forms) present. As always, if you haven't saved yet now is a great time!

Next, we'll need a way to show off and edit our new Classes. Turning to the Form Customization Toolbox, click and drag a Tab Control into the primary request form area, when you see the blue grid, then drag it up into the tab menu just to the right of the History tab. Make no mistake, this is a slightly frustrating part because unlike Visual Studio this dumb downed version strictly for SCSM is not without it's challenges. If you are currently yelling trying to get the Tab Control onto your canvas and to the right of history...well there is no other way to say this. You'll have to keep trying. It's rather annoying but once you do it, you'll never forget. It's a known issue and I can only hope gets resolved sooner or later.


Much like the properties we created, simply by selecting the item we've just added we're presented with a host of options.


I won't waste time going over what all of these properties are (they are rather self-explanatory, so if you're curious just edit one and see what happens!) because we're only after one property here and it's the "Content" property all the way at the bottom. This for all intents and purposes is the text that is displayed on screen in our form. Since it's a display value only, you could call it whatever you like and have spaces in it but for the sake of good naming conventions I'm just going to call it what it contains. Once you've done that (and if you haven't already) double click on your new tab to present yourself with a blank page.


First off, let's just cut to the chase and show you how to display one of your custom classes on this form. From your Form Customization Toolbox pane, click and drag Text Box out onto your form. With the new text box you just dropped onto the form still selected, head over to your Details pane and look for "Binding Path" then click the ellipses in that.


It's worth pointing out that you can also just drag the property from your Class Browser onto the Form canvas and not only will your binding path automatically get set, it will also pull the correct relationship. Time saver!

On the next window, find a property you'd like to represent. Staying true to Part 1's first example, let's go with Employee First Name then hit OK


Next, it wouldn't hurt to grab a Label and name it accordingly...


Before you go on, the following is worth pointing out. While you could easily repeat the above steps and start presenting all of your custom classes - I'd actually advise against it...well from a design perspective at least. You're welcome to ignore me if you really hate design, but chances are you and other members of your IT department wouldn't mind having some consistency within the SCSM Console. Rather than keep dragging labels and text boxes out onto your form, I suggest you first drag a Panel object out onto your form. Then place your labels and or text boxes inside of the Panel object. I say this for one reason and one reason alone - you can either rearrange all of your labels/boxes every time you have to make an update to this form OR you could just move a panel with all of your objects inside of it saving you a significant amount of time when it comes to updating/redesigning your form.

For example, you could drag out two panels - 1 for labels and 1 for text boxes. Then all of your labels you can right justify and all of your text boxes you could left justify. Then you could drag the panels right up next to each other. Then again, you could drag a panel out for every single label/text box pair. The point here is there are a few ways to do this and they are up to you, the designer of the management pack of how you choose to implement.

So what other types of things do I need to present my classes? It's more than text boxes right?

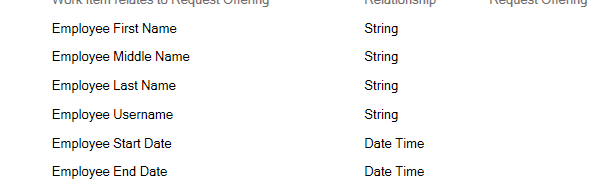
You are absolutely right. How do you know what to use? Easy, visit your custom class page for a great jump start! For example, here's mine (as defined in Part 1)

Employee End Date = Date Time (text box)
Employee First Name = String (text box)
Employee Last Name = String (text box)
Employee Middle Name = String (text box)
Employee Start Date = Date Time (text box)
Employee Username = String (text box)
Employee Department = List (list)
Employee Manager = Relationship  (user picker)

That said, the steps are pretty much the same. You'll always drag out a label, you'll always drag a new type of item out and you'll always define it's Binding Path property. Here's my form as it relates to the properties we created in Part 1.


Finally as an interesting point, if you save the Form as it is right now (i.e. you are on this new Tab you created). When you get to importing the mgmt pack, anytime you open it in the console it will always open on this page. Depending on how you choose to view this it may be desirable for your environment where you want to get to the core of the request asap but may be undesirable if you are building a management pack for someone else.

With the above said, context matters:
  • If you want the SR to pop the General tab on open, navigate to the General tab and save your management pack
  • If you want the SR to pop on the Employee Information tab, navigate to the Employee Information tab and save your management pack

Alright. So our Employee Management pack is almost ready for production! As a refresher here's what we've done so far...
  1. Created an empty management pack
  2. Added a bunch of custom definitions to it (Class)
  3. Created a relationship between our management pack's XML file and Microsoft's Out of Box Service Request Forms dll (Assembly)
  4. Used this relationship to build a custom form to present our custom Class on (Form)
We have only have a THREE steps left before you're ready to import! Let's get to 'em!

Let's Get to XML Editing!
That title probably didn't deserve an exclamation mark, but I digress. After you've made your decision as to what tab you want to pop and you've saved your management pack close out of the Authoring Tool.

What we're going to do next is manually modify the XML that defines our currently unsealed management pack. It's not as scary as it sounds, but it's worth making a copy of the management pack and working with a copy before making these edits. If you don't have/use it, I highly recommend downloading yourself a copy of Notepad++ to make edits these files. You can use native Windows Notepad or other plain text editors if you choose.

Once you have your file open, do a CTRL+F and look for the single word "TypeProjections". It will turn up twice. The following is a screenshot in Notepad++ of said area we're looking for. I've added a hint line so you know exactly how to copy and paste everything following after the screenshot.


<Component Path="$Target/Path[Relationship='WorkItem!System.WorkItemAssignedToUser']$" Alias="AssignedTo" />
          <Component Path="$Target/Path[Relationship='WorkItem!System.WorkItemClosedByUser']$" Alias="ClosedBy" />
          <Component Path="$Target/Path[Relationship='WorkItem!System.WorkItemCreatedByUser']$" Alias="CreatedBy" />
          <Component Path="$Target/Path[Relationship='WorkItem!System.WorkItemAffectedUser']$" Alias="AffectedUser" />
          <Component Path="$Target/Path[Relationship='WorkItem!System.WorkItemRelatesToConfigItem']$" Alias="RelatedConfigItems" />
          <Component Path="$Target/Path[Relationship='WorkItem!System.WorkItemAboutConfigItem']$" Alias="AboutConfigItem" />
          <Component Path="$Target/Path[Relationship='WorkItem!System.WorkItemAboutConfigItem' TypeConstraint='System!System.Service']$" Alias="AffectedServices" />
          <Component Path="$Target/Path[Relationship='WorkItem!System.WorkItemRelatesToWorkItem']$" Alias="RelatedWorkItems">
            <Component Path="$Target/Path[Relationship='WorkItem!System.WorkItemAssignedToUser']$" Alias="RelatedWorkItemAssignedTo" />
          </Component>
          <Component Path="$Target/Path[Relationship='WorkItem!System.WorkItemRelatesToWorkItem' SeedRole='Target']$" Alias="RelatedWorkItemSource">
            <Component Path="$Target/Path[Relationship='WorkItem!System.WorkItemAssignedToUser']$" Alias="RelatedWorkItemAssignedTo" />
          </Component>
          <Component Path="$Target/Path[Relationship='WorkItem!System.WorkItemHasFileAttachment']$" Alias="FileAttachments">
            <Component Path="$Target/Path[Relationship='SupportingItem!System.FileAttachmentAddedByUser']$" Alias="FileAttachmentAddedBy" />
          </Component>
          <Component Path="$Target/Path[Relationship='CoreKnowledge!System.EntityLinksToKnowledgeDocument']$" Alias="RelatedKnowledgeArticles" />
          <Component Path="$Target/Path[Relationship='Catalog!System.WorkItemRelatesToRequestOffering']$" Alias="RelatedRequestOffering" />
          <Component Path="$Target/Path[Relationship='WorkItem!System.WorkItemHasActionLog' TypeConstraint='WorkItem!System.WorkItem.TroubleTicket.ActionLog']$" Alias="ActionLog" />
          <Component Path="$Target/Path[Relationship='WorkItem!System.WorkItemHasCommentLog' TypeConstraint='WorkItem!System.WorkItem.TroubleTicket.AnalystCommentLog']$" Alias="AnalystCommentLog" />
          <Component Path="$Target/Path[Relationship='WorkItem!System.WorkItemHasCommentLog' TypeConstraint='WorkItem!System.WorkItem.TroubleTicket.UserCommentLog']$" Alias="EndUserCommentLog" />

Next, scroll up to the top to your <References> section and paste everything beneath the following screenshot.


      <Reference Alias="WorkItem">
       <ID>System.WorkItem.Library</ID>
       <Version>7.5.2905.0</Version>
       <PublicKeyToken>31bf3856ad364e35</PublicKeyToken>
     </Reference>
     <Reference Alias="SupportingItem">
       <ID>System.SupportingItem.Library</ID>
       <Version>7.5.2905.0</Version>
       <PublicKeyToken>31bf3856ad364e35</PublicKeyToken>
     </Reference>
     <Reference Alias="CoreKnowledge">
       <ID>System.Knowledge.Library</ID>
       <Version>7.5.2905.0</Version>
       <PublicKeyToken>31bf3856ad364e35</PublicKeyToken>
     </Reference>
     <Reference Alias="Catalog">
       <ID>System.ServiceCatalog.Library</ID>
       <Version>7.5.2905.0</Version>
       <PublicKeyToken>31bf3856ad364e35</PublicKeyToken>
     </Reference>

Save the management pack then try to open it with the Authoring Tool. If it opens without error, congrats!

Alright...what did I just do besides copy and paste your answers?

So in the first copy and paste for TypeProjections we are defining the standard out of box Service Request relationships. These exist natively to Service Requests and we're merely just stealing the XML so that our Service Request also leverages these native relationships

In the second copy and paste for References we are creating management pack relationships. A very common thing in the general System Center world. Rather than re-invent the wheel you can leverage management packs already developed and defined by Microsoft for use in your management packs. If you look closely, take note of the "Alias" for each reference. It should make a bit more sense.

Time to Seal a Management Pack!
The thing we've created up until this point is a plain-text XML file. However because our management pack defines relationships, has a bunch of customizations, and we'll probably want to upgrade it in the future we need to seal. As you may or may not already be aware if you overwrite an unsealed management pack, the customizations are lost, and then replaced. With a sealed management pack this won't happen and we'll be able to upgrade over previous versions of the management pack.

The act of sealing a management pack (XML) converts it into a *.mp. This new file is the binary representation of that identical XML file. Once it becomes an mp/binary file Service Manager will prevent us from within the console saving customizations into it (this is a good thing!)

So how do you seal? If you guessed with some type of passphrase that only you know, you're almost right. Instead we're going to have Visual Studio generate a keypair. This keypair let's us digitally sign the file. Now it means that if the XML is signed with another key and tried to be upgraded - it will fail since the signatures don't match. Suffice it to say, host of reasons sealing is awesomely necessary. If you have Visual Studio installed you're pretty much set to do this. If not you can get the tools required to build this keypair via the Windows SDK located here. During the install you'll want to make sure you install Tools located underneath .NET Development.

Finally, once this is all installed you are ultimately looking for the Visual Studio Command Prompt. It's here that you'll be able to do this...

sn –k c:\MyKeyName.snk


Store your keyfile in a safe place! You're going to need it anytime you want to upgrade your MP! Now, back to the Authoring Tool!

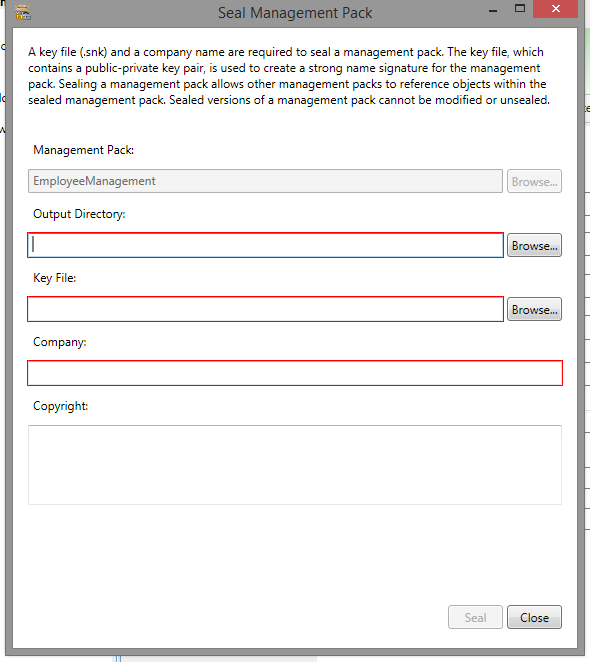
Right click on your management pack and click "Seal Management Pack"


Fill out where you want to save the exported MP too (I'm going to suggest the directory you are currently saving the XML version in for the final step), the location for your key file, and finally company information. Optionally you can punch in copyright information. Then hit seal.

ONE LAST STEP (really. I promise.)

Create a Management Pack Bundle
The absolute last thing we need to do is combine our MP + the Service Request dll file we used to build our form. Once combined we're going to end up with an *.MPB file that compromises these two sub files.

To do this, kick open PowerShell ISE and drop in the following...

#ONE: Import Service Manager Cmdlets
import-module "C:\Program Files\Microsoft System Center 2012 R2\Service Manager\Powershell\System.Center.Service.Manager.psd1"

#TWO: Specify the Path and filename of your sealed MP
$mp = "C:\EmployeeManagement.mp"

#THREE: Specify the path and file name of the Service Request Assembly (the SR dll assembly)
$assembly01 = "C:\Microsoft.EnterpriseManagement.ServiceManager.Applications.ServiceRequest.Forms.dll"

#FOUR: Specify target path of the final MPB
$mpb = "C:\EmployeeManagement.mpb"

#FIVE – Bundle the sealed MP and assembly as the MPB file
new-scsmmanagementpackbundle -name $mpb -Managementpack $mp -resource $assembly01 -computername yourSCSMmanagementServerHere

You could run this directly off of one of your SCSM management servers or you could do it the remote powershell way and just add the computername parameter like I did above.


DONE!
Well with the management pack authoring at least! Next we need to build the Request Offering in Service Manager and ultimately the Orchestrator runbooks for the 4-5 requests this management pack is going to support.

Part 3 is here

Sunday, April 12, 2015

Service Manager - Employee Management, Part 1

12:13 PM Posted by A No comments


One of the big payoffs of Service Manager is its ability to feed and leverage Orchestrator so as to automate...you know what. This is the part of almost every other blog I see, say "anything" and I'll try my hardest not to in this case. Because I want to talk about Employee Management or perhaps a more direct way of saying it - LETS AUTOMATE ACTIVE DIRECTORY!!!

It's a bold statement to many I'm sure. But I can assure you that day to day AD management is thing of the past as organization come on board with SCSM and SCO. New employees? Returning employees? Terminating employees? All of these mundane tasks can be automated leaving your IT department time to focus on actual IT work. Make no mistake, if you haven't started customizing your Service Manager environment yet then buckle up because you have to in order achieve Active Directory automation through SCSM and SCO. So before we even get into either of those programs, let's get into the SCSM Authoring Tool to start building a custom management pack for your business that you'll leverage to do a few things with...
  • Onboard Employees
  • Terminate Employees
  • Change Employee Titles, Managers, etc.
  • Extend Expiration Dates
  • Reactivate Employees
After all, part of Service Manager's sell is this "Service Request" idea with heavy automation and no less truly customizing the product to your needs. Fortunately there is enough of a "base class" that the management pack we'll build we'll meet enough of these objectives and leave plenty of room for you to innovate within. Anyway, time to get started.

Getting Started
NOTE: Times have changed and so have my opinions. Please read this first - http://scsmmercenary.blogspot.com/2016/02/in-defense-of-class-extension-vs.html

To begin assembling our management pack, we're going to take the (as I like to refer to it) middle of the road approach via the Service Manager Authoring Tool. I say middle of the road approach as the two alternatives are raw XML writing (probably not something you're interested in learning...yet) and Visual Studio Authoring Extensions (VSAE for short) that requires a fundamental understanding of how management packs are assembled in the first place PLUS programming experience as these plugins are built for Visual Studio (a tool typically used by dedicated developers).

Regardless, you'll need to the get the Service Manager Authoring Tool installed. You can read my setup instructions here since you will run into an issue installing it. http://scsmmercenary.blogspot.com/2015/02/scsm-management-pack-authoring-101.html
Lets Build the Empty Management Pack...
Alright, now that you the Authoring tool up and running time to start assembling our basics for said management pack. As is standard for Windows apps, we'll start by going to File -> New and giving our management pack a name. You can call it whatever you'd like, just keep in mind as we move forward to substitute what I call it for yours. I'm going to call mine EmployeeManagement. You'll also quickly discover if you didn't like my single word name, that you can't create management packs with spaces, special characters, etc.

Sometimes I think it'd be great if I was done at this point.


So now we have an empty management pack, the next step is to fill it with our customizations! If you are new to the Service manager world you may also be still coming to terms with the idea of Service Requests, Incidents, etc. Suffice it to say this is how you should, if not absolutely need to view the following...
  • Incidents are break/fix scenarios
    • They can be viewed as singular entities
    • They are things like "my laptop blue screened" or "Failed to setup new employee accounts"
    • Your end user community can raise them
    • System Center components can raise them
  • Service Requests typically start with a "I need..."
    • Nothing is broken
    • They are things like "I need a new laptop" or "I need to order a Bluetooth headset" or "I need to hire a new employee"
    • They are by definition requests
    • They entities that are comprised of child work items (in the case of SCSM they are Activities)
    • The activity flow are what you or your management may typically refer to as the request  "workflow"
With the above said, we are going to be working within the Service Request to manage our employees, automate Active Directory, etc and to do so we are going to alter the native functionality of the Service Request class of SCSM. An entirely supported, native, and expected thing Microsoft expects you as a customer of SCSM to do.

Building our Custom Management Pack Foundation...
Next, let's open the OOB Service Request You can do this via the search in the Autoring Tool, right clicking on it, and then hitting "View"


 Now your open management pack selection should look like this...


If you read through the Management Pack Authoring 101 tutorial, we are going to leverage the native Microsoft provided Management Pack to build our custom version of it. To do so, we're going to:

  1. Right-click on the "Service Request" class that we just opened from the native Microsoft Management Pack
  2. Then we're going to hit "Inherit from this class"
Why Inherit? Why not extend? Seems like I'm already doing something wrong

I feel this verbiage could be written a bit better, but regardless I want to quickly explain this difference.

  1. Extend Class - Whatever customization I'm building, I want to appear on EVERY instance of that particular item
    1. Example: I want the Affected User's manager to appear as a field on every Incident form I open
  2. Inherit from this class - Whatever customization I'm building, I want to appear ONLY within the thing that I'm building 
    1. Example: I want to build an employee onboarding management pack, but I don't want the things I'm building to appear on all Service Requests. Because it'd be weird to see "Order a New PC" with this kind of information on it.
With this said - we're clearly choosing Option #2. Hopefully that make a bit more sense? Moving along! After selecting "Inherit from this class" we get the infamous "Your customizations cannot be saved in a sealed management pack." Here's where we pick our empty management pack, as we'll store all the changes we make to this thing. 


The next thing you'll have to do is uniquely name your modified version of the Service Request class. I called mine "ServiceRequestHumanResources" there a few reasons I did this and I don't want to digress explaining them now, but one of the reasons has to do with Orchestrator which I'll get into subsequent posts.


Hurray, the class has been inherited and it's now inside my under development management pack!


Next, I'll give a friendly name to this class by changing the "Class name" and adding a useful description for myself/onlookers of future Service Manager management pack development.


Finally, the last thing we need to do is scroll down within the "Class properties and relationships" area and go all the way to bottom to find and then delete a property that the Authoring Tool creates by default. We need to delete it as you may have noticed in several places the Authroing Tool likes to remind you to "Provide an internal name. This name cannot be changed"

The fact the Authoring tool creates this default property that is already named almost sets you up from failure from the start if you aren't paying attention because you can't rename them! That said, find it and delete it via the red X.


Now Lets Build the Management Pack!
Before we go any further do yourself a favor and hit the Save icon if you haven't already. As you may or may have not figured out yet, the only thing we've done is setup the basis for this EmployeeManagement pack of ours. We haven't done ANY customizations yet, this has all just been prep work for the next steps. So again, this is a great point to hit Save if you haven't already! Alright, now for the fun development part where I won't blame you if ideas start going off in your head for how to ramp up your own version of this management pack as it relates to your organization.

We're going use the "Create Property" button within the Authoring tool and create our first property. Let's start simple and get the obvious stuff out of the way first.


Here I'm creating a property called "EmployeeFirstName" and I'll use it in my Service Requests to as you may have guessed it store the employee's first name as a plain text (string) value. After hitting Create you'll unlock a new window within the Authoring tool listing all the possibilities you have to define this new property.


These are the default settings for any new property we create within the Authoring tool and of course, grants us the flexibility to change the property to suit our needs. If you've never used Visual Studio this is a common Window made available to developers to...well define properties! So with our "EmployeeFirstName" property...
  1. I may want to add a description. I'll see this inside of the Service Manager console once the management pack has been impoorted
  2. I can change the Name to something more friendly, may put some spaces in there so it's called "Employee First Name"
  3. That's good for this property. It's just a first name, not too much to build on this.
So what's next? How about...
  1. EmployeeMiddleName
  2. EmployeeLastName
  3. EmployeeTitle
  4. EmployeeUsername
If you made it through the steps for configuring the First Name property, repeat for the above four properties. I'll be here while you take care of that.

OK, next properties you probably want and may have already thought of...
  1. EmployeeStartDate
  2. EmployeeEndDate
After creating the first or both of those properties, we need to do something we haven't had to do in the previous examples and that's change the DataType of the property. By default everything is a String, but in the case of a date...well we just need to change it to a DateTime property. Just click inside of DataType and you'll be able to select a drop down menu. Lot of options in here!


With the above done, your management pack should look like the following (unless of course you got really giddy when you realized how quickly you could put this together and decided to start building out a bunch of other properties).


Handling the Manager attribute... 

Well yeah, I did those. But I also added one for EmployeeManager. I get where you're headed with this n all.

Sure, that's fine because why wouldn't you, but, BUT! Did you use the same steps as above in that you hit "Create Property"- Because DON'T DO THAT! Instead what you need to do is "Create Relationship"


So why do you need to do this? Technically speaking (and technicalities matter here) you've probably interacted with Active Directory in your career. When you open up a user's account, you see a lot of plain text (string) fields that you can just type into. Other fields such as the "Manager" field of a user, you'll notice AD doesn't let free form text in the field. In fact, you have to use a User Picker, search for another AD account, and then it drops that person in as the manager. That's because inside of Active Directory you are actually creating a relationship between the two accounts. The same exact principal applies here within the Authoring Tool.


So once we've created our first Relationship, we need to modify the Target Class. We'll switch it from Object to Active Directory User.


Handling the Department attribute...

I made one for Departments, because I'd like to be able to select a list of departments or type them in. You know, something like that.

There are at least two ways (that I can think of) that you could do this. So I'll share them and let you be the judge. Even though my bias is clearly built in...

  1. You leave the "EmployeeDepartment" datatype as a String. Then in the Service Offering you build within SCSM, you may call a field "Department" and then select "Simple List". Then you'd precede to add all of your department to it.
    1. I don't like this because it means anytime I need to rename, add, or remove a department I have to go all the way into the in-production Service Offering. It feels like I'm editing something larger, when in truth I'm modifying just this one thing.
  2. In the Management Pack you change "EmployeeDepartment" datatype to be a List
    1. This is the method I prefer, because in doing so I now end up creating another Management Pack that stores this List (and potentially other EmployeeManagement Lists, maybe a Job Status list? Working hours list?) in the same management pack. In doing so, now I can make changes to a list within the Lists pane of Service Manager. In this route, I could have multiple Service Requests/Offerings be driven by a common List
  3. You build some type of QueryResult that pulls Active Directory user's department attributes and dynamically build the selection
    1. I admit, I'm torn on this. It's advantageous because I seemingly then never have to update anything. However what if the HR department creates a new department? In this scenario (I think) I'd have to create a new Active Directory user with that department name to get it to pop in my query result. This seems like more AD management. Then again, if you've delegated rights of AD to the HR department, maybe it's entirely do-able? Call me a control freak but I'd rather keep this specific attribute to myself. Like I said, I'm torn but never the less investigating a logical way to do this.
So I'll show you how to do this via my preferred method (#2).


1. Change the datatype for EmployeeDepartment to "List". Upon doing so, this window will pop...


 2. Then hit "Create List" and give it a name. The internal name has to be unique so make sure you aren't colliding with another List you may have created. I just called mine "Departments".


DONE! That's it. You'll create the other management pack where you store items in the list later (i.e. after you've imported the Employee Management pack because then you'll see "Departments" in the Lists area).


In the next post we'll go over the Service Request Form design so you can see all of these new properties you've just created inside of SCSM, sealing your management pack, importing it, and playing with the new Departments list we've just created. Don't forget, hit the Save button!!!

Part 2 is here