
My personal driving incentive here is to familiarize people who have ZERO experience with Service Manager, Orchestrator, and PowerShell - a starting ground from the perspective of someone who has to develop for the entire product by themselves. Don't even get me started on the 18 blogs, 3 TechNet forums, and other places I had to compile in my head just to build a "Create a Shared Mailbox on Office 365" Service Request. Blehhh...well. Now that I think of it, that would probably make a good post. Anyway, back to customizing that EmployeeManagement management pack!
NOTE: Times have changed and so have my opinions. Please read this first - http://scsmmercenary.blogspot.com/2016/02/in-defense-of-class-extension-vs.html
With the definitions of our management pack...uhh....defined. Next we want to customize the Service Request form so that we can interact with these properties from the Service Manager console.

 |
| One of those options look familiar? :) |
Now before you can fill out the next window that pops up, there is some file management we need to take care of before moving on. Open up File Explorer and navigate to the Authoring Tool installation directory. It should be this...
C:\Program Files (x86)\Microsoft System Center 2012\Service Manager Authoring\Library\ServiceRequest
And then copy this file to the directory where you are currently saving your EmployeeManagement management pack too.
Microsoft.EnterpriseManagement.ServiceManager.Applications.ServiceRequest.Forms.dll

Wait a second, how did you know how to do that. There is no way I would have known to find this file, in this folder...
This is one of my larger criticisms on the Service Manager development front, because it's this kind of stuff that makes SCSM not only look intimidating to outsiders, but it makes less approachable when the only documentation that can only be assumed to exist is TechNet. Even still, this in its own right requires one to invest a fair amount of time (no less if you've never done this before)! This also to be fair is the kind of thing that is part of the "hidden costs" of Service Manager and that hidden cost is development time.
Regardless, now you know this is here! But more importantly you can go up a level and find other familiar classes (like Incident, Change Request, etc) and take what you learn here to apply to those forms as well.
C:\Program Files (x86)\Microsoft System Center 2012\Service Manager Authoring\Library
Let's Build a Form!
Now on that new Window that opened up after you hit "Add Custom" we need to define a few things.

The first thing I've done is given a name to my form, in this case I went with "EmployeeInformationForm". Next, I browsed to where my custom management pack is currently stored (and where I copied that dll too) and select that dll. If you read the file name it's may be rather obvious what we are doing here - taking the original Service Request form (as defined by Microsoft), and making our own derivation of it. Finally in Type we select "ServiceRequestForm" since that dll contains a few different definitions. Then hit Create.
 |
| Woot! |
Next, we'll need a way to show off and edit our new Classes. Turning to the Form Customization Toolbox, click and drag a Tab Control into the primary request form area, when you see the blue grid, then drag it up into the tab menu just to the right of the History tab. Make no mistake, this is a slightly frustrating part because unlike Visual Studio this dumb downed version strictly for SCSM is not without it's challenges. If you are currently yelling trying to get the Tab Control onto your canvas and to the right of history...well there is no other way to say this. You'll have to keep trying. It's rather annoying but once you do it, you'll never forget. It's a known issue and I can only hope gets resolved sooner or later.

Much like the properties we created, simply by selecting the item we've just added we're presented with a host of options.

I won't waste time going over what all of these properties are (they are rather self-explanatory, so if you're curious just edit one and see what happens!) because we're only after one property here and it's the "Content" property all the way at the bottom. This for all intents and purposes is the text that is displayed on screen in our form. Since it's a display value only, you could call it whatever you like and have spaces in it but for the sake of good naming conventions I'm just going to call it what it contains. Once you've done that (and if you haven't already) double click on your new tab to present yourself with a blank page.

First off, let's just cut to the chase and show you how to display one of your custom classes on this form. From your Form Customization Toolbox pane, click and drag Text Box out onto your form. With the new text box you just dropped onto the form still selected, head over to your Details pane and look for "Binding Path" then click the ellipses in that.

On the next window, find a property you'd like to represent. Staying true to Part 1's first example, let's go with Employee First Name then hit OK

Next, it wouldn't hurt to grab a Label and name it accordingly...

Before you go on, the following is worth pointing out. While you could easily repeat the above steps and start presenting all of your custom classes - I'd actually advise against it...well from a design perspective at least. You're welcome to ignore me if you really hate design, but chances are you and other members of your IT department wouldn't mind having some consistency within the SCSM Console. Rather than keep dragging labels and text boxes out onto your form, I suggest you first drag a Panel object out onto your form. Then place your labels and or text boxes inside of the Panel object. I say this for one reason and one reason alone - you can either rearrange all of your labels/boxes every time you have to make an update to this form OR you could just move a panel with all of your objects inside of it saving you a significant amount of time when it comes to updating/redesigning your form.
For example, you could drag out two panels - 1 for labels and 1 for text boxes. Then all of your labels you can right justify and all of your text boxes you could left justify. Then you could drag the panels right up next to each other. Then again, you could drag a panel out for every single label/text box pair. The point here is there are a few ways to do this and they are up to you, the designer of the management pack of how you choose to implement.
So what other types of things do I need to present my classes? It's more than text boxes right?
You are absolutely right. How do you know what to use? Easy, visit your custom class page for a great jump start! For example, here's mine (as defined in Part 1)
Employee End Date = Date Time (text box)
Employee First Name = String (text box)
Employee Last Name = String (text box)
Employee Middle Name = String (text box)
Employee Start Date = Date Time (text box)
Employee Username = String (text box)
Employee Department = List (list)
Employee Manager = Relationship (user picker)
That said, the steps are pretty much the same. You'll always drag out a label, you'll always drag a new type of item out and you'll always define it's Binding Path property. Here's my form as it relates to the properties we created in Part 1.

Finally as an interesting point, if you save the Form as it is right now (i.e. you are on this new Tab you created). When you get to importing the mgmt pack, anytime you open it in the console it will always open on this page. Depending on how you choose to view this it may be desirable for your environment where you want to get to the core of the request asap but may be undesirable if you are building a management pack for someone else.
With the above said, context matters:
- If you want the SR to pop the General tab on open, navigate to the General tab and save your management pack
- If you want the SR to pop on the Employee Information tab, navigate to the Employee Information tab and save your management pack
Alright. So our Employee Management pack is almost ready for production! As a refresher here's what we've done so far...
- Created an empty management pack
- Added a bunch of custom definitions to it (Class)
- Created a relationship between our management pack's XML file and Microsoft's Out of Box Service Request Forms dll (Assembly)
- Used this relationship to build a custom form to present our custom Class on (Form)
Let's Get to XML Editing!
That title probably didn't deserve an exclamation mark, but I digress. After you've made your decision as to what tab you want to pop and you've saved your management pack close out of the Authoring Tool.
What we're going to do next is manually modify the XML that defines our currently unsealed management pack. It's not as scary as it sounds, but it's worth making a copy of the management pack and working with a copy before making these edits. If you don't have/use it, I highly recommend downloading yourself a copy of Notepad++ to make edits these files. You can use native Windows Notepad or other plain text editors if you choose.
Once you have your file open, do a CTRL+F and look for the single word "TypeProjections". It will turn up twice. The following is a screenshot in Notepad++ of said area we're looking for. I've added a hint line so you know exactly how to copy and paste everything following after the screenshot.

<Component Path="$Target/Path[Relationship='WorkItem!System.WorkItemAssignedToUser']$" Alias="AssignedTo" />
<Component Path="$Target/Path[Relationship='WorkItem!System.WorkItemClosedByUser']$" Alias="ClosedBy" />
<Component Path="$Target/Path[Relationship='WorkItem!System.WorkItemCreatedByUser']$" Alias="CreatedBy" />
<Component Path="$Target/Path[Relationship='WorkItem!System.WorkItemAffectedUser']$" Alias="AffectedUser" />
<Component Path="$Target/Path[Relationship='WorkItem!System.WorkItemRelatesToConfigItem']$" Alias="RelatedConfigItems" />
<Component Path="$Target/Path[Relationship='WorkItem!System.WorkItemAboutConfigItem']$" Alias="AboutConfigItem" />
<Component Path="$Target/Path[Relationship='WorkItem!System.WorkItemAboutConfigItem' TypeConstraint='System!System.Service']$" Alias="AffectedServices" />
<Component Path="$Target/Path[Relationship='WorkItem!System.WorkItemRelatesToWorkItem']$" Alias="RelatedWorkItems">
<Component Path="$Target/Path[Relationship='WorkItem!System.WorkItemAssignedToUser']$" Alias="RelatedWorkItemAssignedTo" />
</Component>
<Component Path="$Target/Path[Relationship='WorkItem!System.WorkItemRelatesToWorkItem' SeedRole='Target']$" Alias="RelatedWorkItemSource">
<Component Path="$Target/Path[Relationship='WorkItem!System.WorkItemAssignedToUser']$" Alias="RelatedWorkItemAssignedTo" />
</Component>
<Component Path="$Target/Path[Relationship='WorkItem!System.WorkItemHasFileAttachment']$" Alias="FileAttachments">
<Component Path="$Target/Path[Relationship='SupportingItem!System.FileAttachmentAddedByUser']$" Alias="FileAttachmentAddedBy" />
</Component>
<Component Path="$Target/Path[Relationship='CoreKnowledge!System.EntityLinksToKnowledgeDocument']$" Alias="RelatedKnowledgeArticles" />
<Component Path="$Target/Path[Relationship='Catalog!System.WorkItemRelatesToRequestOffering']$" Alias="RelatedRequestOffering" />
<Component Path="$Target/Path[Relationship='WorkItem!System.WorkItemHasActionLog' TypeConstraint='WorkItem!System.WorkItem.TroubleTicket.ActionLog']$" Alias="ActionLog" />
<Component Path="$Target/Path[Relationship='WorkItem!System.WorkItemHasCommentLog' TypeConstraint='WorkItem!System.WorkItem.TroubleTicket.AnalystCommentLog']$" Alias="AnalystCommentLog" />
<Component Path="$Target/Path[Relationship='WorkItem!System.WorkItemHasCommentLog' TypeConstraint='WorkItem!System.WorkItem.TroubleTicket.UserCommentLog']$" Alias="EndUserCommentLog" />
Next, scroll up to the top to your <References> section and paste everything beneath the following screenshot.

<Reference Alias="WorkItem">
<ID>System.WorkItem.Library</ID>
<Version>7.5.2905.0</Version>
<PublicKeyToken>31bf3856ad364e35</PublicKeyToken>
</Reference>
<Reference Alias="SupportingItem">
<ID>System.SupportingItem.Library</ID>
<Version>7.5.2905.0</Version>
<PublicKeyToken>31bf3856ad364e35</PublicKeyToken>
</Reference>
<Reference Alias="CoreKnowledge">
<ID>System.Knowledge.Library</ID>
<Version>7.5.2905.0</Version>
<PublicKeyToken>31bf3856ad364e35</PublicKeyToken>
</Reference>
<Reference Alias="Catalog">
<ID>System.ServiceCatalog.Library</ID>
<Version>7.5.2905.0</Version>
<PublicKeyToken>31bf3856ad364e35</PublicKeyToken>
</Reference>
Save the management pack then try to open it with the Authoring Tool. If it opens without error, congrats!
Alright...what did I just do besides copy and paste your answers?
So in the first copy and paste for TypeProjections we are defining the standard out of box Service Request relationships. These exist natively to Service Requests and we're merely just stealing the XML so that our Service Request also leverages these native relationships
In the second copy and paste for References we are creating management pack relationships. A very common thing in the general System Center world. Rather than re-invent the wheel you can leverage management packs already developed and defined by Microsoft for use in your management packs. If you look closely, take note of the "Alias" for each reference. It should make a bit more sense.
Time to Seal a Management Pack!
The thing we've created up until this point is a plain-text XML file. However because our management pack defines relationships, has a bunch of customizations, and we'll probably want to upgrade it in the future we need to seal. As you may or may not already be aware if you overwrite an unsealed management pack, the customizations are lost, and then replaced. With a sealed management pack this won't happen and we'll be able to upgrade over previous versions of the management pack.
The act of sealing a management pack (XML) converts it into a *.mp. This new file is the binary representation of that identical XML file. Once it becomes an mp/binary file Service Manager will prevent us from within the console saving customizations into it (this is a good thing!)
So how do you seal? If you guessed with some type of passphrase that only you know, you're almost right. Instead we're going to have Visual Studio generate a keypair. This keypair let's us digitally sign the file. Now it means that if the XML is signed with another key and tried to be upgraded - it will fail since the signatures don't match. Suffice it to say, host of reasons sealing is awesomely necessary. If you have Visual Studio installed you're pretty much set to do this. If not you can get the tools required to build this keypair via the Windows SDK located here. During the install you'll want to make sure you install Tools located underneath .NET Development.
Finally, once this is all installed you are ultimately looking for the Visual Studio Command Prompt. It's here that you'll be able to do this...
sn –k c:\MyKeyName.snk

Store your keyfile in a safe place! You're going to need it anytime you want to upgrade your MP! Now, back to the Authoring Tool!
Right click on your management pack and click "Seal Management Pack"

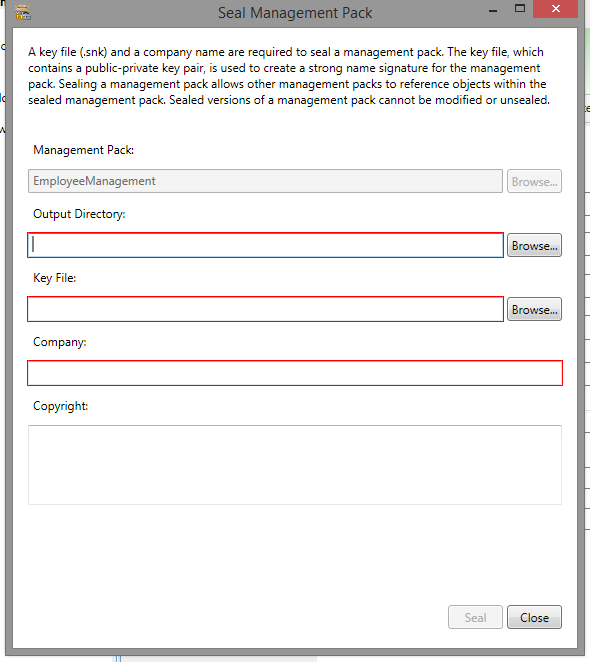
ONE LAST STEP (really. I promise.)
Create a Management Pack Bundle
The absolute last thing we need to do is combine our MP + the Service Request dll file we used to build our form. Once combined we're going to end up with an *.MPB file that compromises these two sub files.
To do this, kick open PowerShell ISE and drop in the following...
#ONE: Import Service Manager Cmdlets
import-module "C:\Program Files\Microsoft System Center 2012 R2\Service Manager\Powershell\System.Center.Service.Manager.psd1"
#TWO: Specify the Path and filename of your sealed MP
$mp = "C:\EmployeeManagement.mp"
#THREE: Specify the path and file name of the Service Request Assembly (the SR dll assembly)
$assembly01 = "C:\Microsoft.EnterpriseManagement.ServiceManager.Applications.ServiceRequest.Forms.dll"
#FOUR: Specify target path of the final MPB
$mpb = "C:\EmployeeManagement.mpb"
#FIVE – Bundle the sealed MP and assembly as the MPB file
new-scsmmanagementpackbundle -name $mpb -Managementpack $mp -resource $assembly01 -computername yourSCSMmanagementServerHere
You could run this directly off of one of your SCSM management servers or you could do it the remote powershell way and just add the computername parameter like I did above.
DONE!
Well with the management pack authoring at least! Next we need to build the Request Offering in Service Manager and ultimately the Orchestrator runbooks for the 4-5 requests this management pack is going to support.
Part 3 is here
Hi, I have followed step 1 and 2 to the letter but i cannot seem to find "TypeProjections" in my XML. Am I missing something?
ReplyDeleteThanks
Rob
I'm certainly open to checking your XML, it sounds as though you didn't choose "Create a Relationship". If I recall correctly, by virtue of selecting this option in the authoring tool, the Type Projection XML is defined allowing the definition I'm referring too.
Delete